Hey there! I’ve recently seen a few questions in forums and on my YouTube channel about Microsoft Project templates—and they usually fall into two buckets:
- Where do I get a template to start a new project?
- How do I create my own template and actually find it later when I need it?
Today I’ll walk you through both. First, I’ll show you where to access Microsoft’s built-in templates (so you can start fast). Then we’ll cover the crucial—but not very obvious—process of saving a project as a template and making sure it’s easy to reuse the next time you create a new schedule.
If you would rather watch a YouTube video on this subject, click here or click the thumbnail below.


Watch the Step-by-Step Video
Prefer to follow along visually? This video demonstrates the exact steps you’ll learn below using Microsoft Project Desktop.
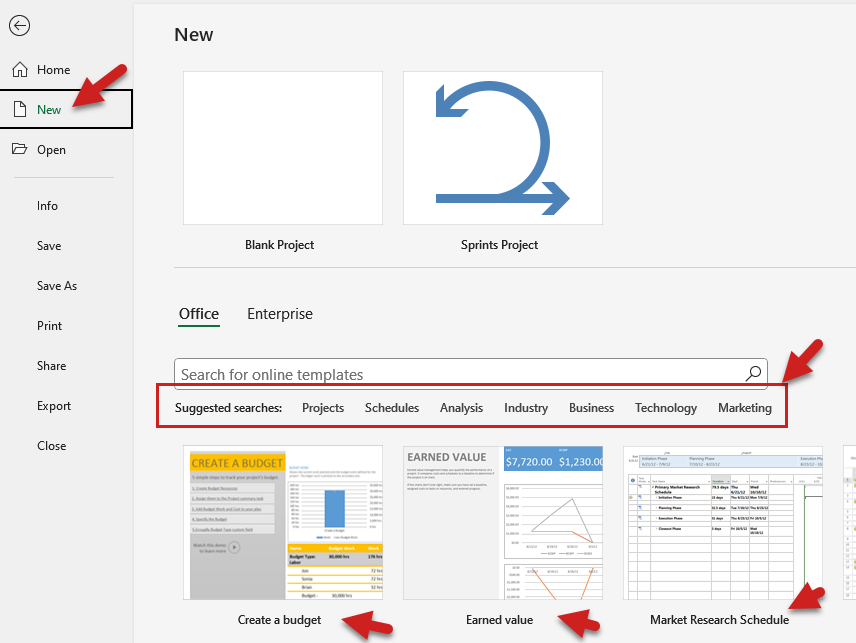
Where to Get Microsoft Project Templates
- Open Microsoft Project.
- Click File in the ribbon.
- Select New.
- Browse the available templates, or use the search box to filter templates by project type.
- Select a template and click Create.
The template opens as a new project file, where you can immediately begin adjusting tasks, dates, resources, and formatting to fit your needs.
Tip: Built-in templates are ideal for common project types and learning how schedules are structured, but they are not customized to your organization by default.
Option 2: Use an Existing Project as a Starting Point
If you already have a project file that closely matches what you need, you don’t have to start from a template at all.
Instead, you can:
- Open an existing project file
- Modify tasks, dates, and resources
- Save it under a new name to reuse the structure
This approach works well when you want speed and don’t need a formally saved template yet.
When Built-In Templates Are Enough (and When They Aren’t)
Built-in templates work well when:
- You need a quick starting point
- Your project structure is fairly standard
- You’re still learning Microsoft Project
You may want to create your own custom template when:
- You reuse the same project structure repeatedly
- You want standardized calendars, views, or formatting
- You want your template to appear every time you create a new project
That’s where creating and saving your own Microsoft Project template becomes valuable.
Creating and Saving Your Own Microsoft Project Template
Once you know where to find templates, the next step is creating and saving your own so you can reuse it whenever you need it.
The first steps in this process actually involve creating a project that you want to use as a template, and then saving that project as a template file.
Prepare Your Project To Be Saved as a Template File
- Create a new project or open an existing project that you want to save as a template.
- Confirm that your project is complete and tailored to your template requirements.
Saving the Microsoft Project Templates
- Click the “File” tab and then click the “Save As” tab on the left side of the Backstage.
- On the Save As page, click the “Browse” button and then browse to the location where you want to save your templates. I prefer to keep mine in a specific folder, which is the “Custom Office Templates” subfolder of the “Documents” main folder.
- In the Save As dialog, enter a name for your template in the “File name” field.
- In the Save As dialog, click the “Save as type” pick list button and select the “Project Template (*.mpt)” item on the list.
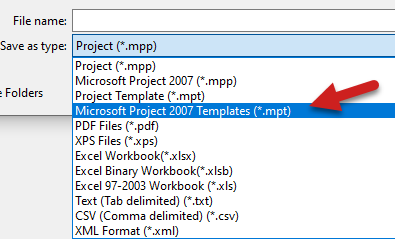
- Click the “Save” button.
- In the “Save As Template” dialog, select all the checkboxes.
- Click the “Save” button to finalize the process.
- Close the newly saved template file.
Set the Default Personal Templates Location
- Click the “File” tab and then click the “Options” tab in the Backstage.
- In the Project Options dialog, click the “Save” tab.
- On the Save page of the dialog, scroll down to the “Save templates” section.
- Notice the option named “Default personal templates location,” which is blank by default.
- Click on the “Browse…” button to the right of this option.
- In the Modify Location dialog, navigate to the folder where you saved your templates. In my case, it’s the “Custom Office Templates” subfolder of the “Documents” main folder.
- Select the location and click the “OK” button.
- Click “OK” button to close the Project Options dialog.
Using Your Microsoft Project Template to Create a New Project
Now that you’ve saved your template and set the default location, creating a new project from the template is a breeze!
- Click the “File” tab and then click the “New” tab in the Backstage.
- Near the top of the New page, click the “Personal” tab. It’s to the right of the “Office” tab.
- Select the desired template on the New page.
- In the preview dialog, click the “Create” button.
- Microsoft Project will generate a new project based on your template, saving you time and effort.
That’s it! You now have the know-how to save and use templates in Microsoft Project seamlessly.
If you have questions, please add them in the “Leave a Reply” section below. Or if you watched the video, add your questions or comments there. Please subscribe to my YouTube channel and leave “Likes” if you like the videos.


Leave a Reply