This guide explains how to remove resource names from Gantt chart in Microsoft Project using two simple, supported methods. Have you ever looked at a cluttered Gantt chart in Microsoft Project where resource names spill out to the right of every task bar? This is especially frustrating when multiple resources are assigned to the same task and the chart becomes hard to read or share.
The good news is that you can remove or hide resource names from the Gantt Chart without deleting the resources themselves — and it only takes a couple of minutes.
Below are two simple, fully supported methods to remove, hide, or even shorten resource names displayed on Gantt bars. These techniques are current and tested in Microsoft Project (Microsoft 365) as of December 2025.


Watch the Step-by-Step Video
Prefer to follow along visually? This video demonstrates the exact steps you’ll learn below using Microsoft Project Desktop.
Step-by-Step: Remove Resource Names from the Gantt Chart in Microsoft Project
Here’s 2 ways to try, let me know which way you prefer. Both methods allow you to remove resource names from Gantt chart in Microsoft Project without affecting assignments.
Method 1: Hide Resource Names Using Bar Styles (Most Common Fix)
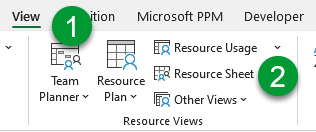
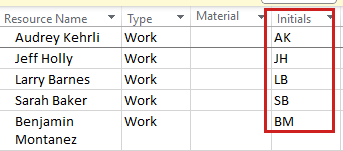
- Go to View → Resource Sheet.
- In the Initials column, enter two- or three-letter initials for each project team member.
- Return to View → Gantt Chart.
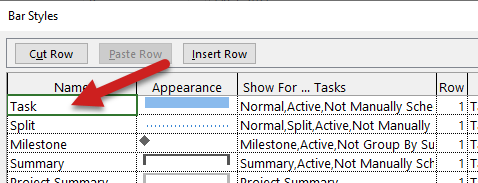
- Double-click anywhere in the white area of the Gantt Chart to open the Bar Styles dialog box.
- In the Name list, leave Task selected.
- Select the Text tab at the bottom of the dialog.
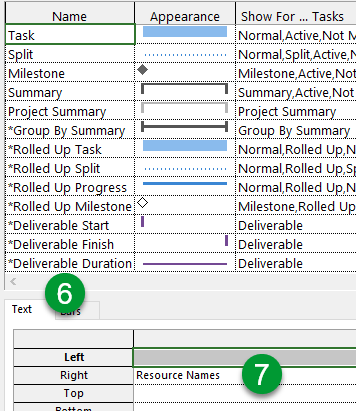
- In the Right text field, replace Resource Names with Resource Initials.
- Click OK to apply the change.
Method 2: Remove/Shorten Resource Names Using Text Styles
Note: This removes resource names from Gantt bars only. Resource assignments remain unchanged in the project.
- In the Gantt Chart view, double-click anywhere in the white area of the chart to open the Bar Styles dialog box.
- At the top of the dialog, leave Task selected in the Name list.
- Click the Text tab at the bottom of the dialog.
- In the Right text field, click where Resource Names is displayed.
- Select Resource Names from the field.
- Press the Delete key on your keyboard to clear the field.
- Click OK to apply the change.
You should now have a much cleaner, more readable Gantt Chart without cluttered resource names running across every task bar. Depending on your needs, you can either replace resource names with initials or remove them entirely while keeping all resource assignments intact.
Choose the method that best fits how you share or present your project schedules.
Bonus Tip: **Quick note about manually scheduled tasks**
A reader asked whether these steps also work with manually scheduled tasks. The answer is yes — both methods work the same for manually scheduled and auto-scheduled tasks.
If needed, simply select Manual Task in the Bar Styles dialog to ensure full coverage. This has been tested from Project 2016 through Microsoft 365.
Frequently Asked Questions
If you found this guide helpful, feel free to leave a comment below with any questions. For more Microsoft Project tips and step-by-step tutorials, be sure to subscribe to my YouTube channel and give the videos a like.


Leave a Reply